
There has been some discussion about the models, and some battle reprots, as Google can show you (a short list of some I've found):
- BoLS
- MyWarGame Hobby Tara Post
- Stink Munk Tara as Outcast
- Early impressions Tara Battle Report
- Youtube Batrep Tara v. Lynch
These all provide great information and insight into Tara. What I would like to focus on right now simply is strategies, since that was the question that sparked this post. Now keep in mind while this post is intended to shed light on how she deals with the strategies we are looking at these in a vacuum, in the sense that obviously these will be coupled with schemes which may (and should) change the crew composition for her. I'll touch on some of what I think she should use for these different strategies. Hopefully this serves as a foundation on why I see Tara being so great at handling these strategies both from a denial (of VPs for your opponent) and a scoring perspective. So sit back and take a read, I'm looking for feedback of course!
So first a reminder of the strategies in M2E, we have the following:


I honestly believe that Tara is competitive and effective at every strategy. She epitomizes the concept that in M2E every master should be able to pull from their own set of tools to get the job done.
Reckoning:
I admit this is the strategy I am the weakest at with her. However, she can draw from such a wide array of heavy hitters whether she is being played as an Outcast or Resurrectionist that she can push out some high damage from models like Killjoy, Bete Noir, Bishop, Taelor, Nothing Beast, Izamu (wave2), etc.
I highly recommend taking Killjoy or Bete, as almost an auto-include in a Reckoning game with Tara simply because she can begin with them buried and unbury them when/where she wants turn 1 or turn 2. Now if you don't take one of them and want to use someone like the Nothing Beast you'll want to include a Death Marshall if you want to use Tara to deliver your beat stick.
Tara also is a fairly good beatstick herself with a 6 tome (Rg. 1) sword and if she needs ranged she can use her Peacebringer at Rg. 10. However, I find her more effective at dropping her models out on the board to kill stuff and then her moving on to do other things.
So the 'combo' you usually want to setup to get some kills with Tara and her beat stick(s) are as follows (FYI this isn't rocket science, but I thought I'd put it here anyways):
- When building her crew include her "Obliteration Symbiote" to get "(1) Faces in the Void"(If using Bete or Killjoy start the game with them buried)
- Activate Tara first and use "(0) Eternal Moment" to gain 'reactivate', move her where she will be safe while the rest of your crew (and your opponents activates).
- If using the Death Marshall first bury your beat stick (make sure to not have activated that model yet of course)
- During her reactive move her into position where you want what she is going to unbury to be in range.
- Cast "(1) Faces in the Void" to unbury your beatstick.
- If you want to give the newly unburied beatstick fast do so via "(1) Temporal Shift" which gives it to any enemy models in range (at a minimum you need to give it to one).
- Do something else with Tara (move her, attack with her, etc.)
- Activate newly unburied model (who now has fast)
For Reckoning its obviously best to wait to do this until turn 2 where you can try and guarantee your two kills for VP.
Turf War:
For Turf War you'll want to take advantage of burying enemy models as much as possible to help remove your opponents models out of the center. Which means, this is the one strategy where you really do want to take advantage of Tara's totem (Karina), and you're going to pay a premium for her because the reason to take her is for her upgrade "Long Forgotten Magics", to help keep the model you have buried under the ground :). So I suggest 2 Death Marshals (via her "Dead of Winter" upgrade) for Tara to help bury models, and of course Hannah with her bury upgrade (again paying a premium, but worth it). Hannah brings a great element to this crew because of her armor. So yeah, with Tara I don't usually use her bury to win games, but this is the the one strategy where I do lean on the mechanic a little more. Finally, if you plan on taking void wretch's drop in the Nothing Beast with his "Voiceless Words" upgrade (or on Tara), coupled with the "Price of Haste" (part of Dead of Winter upgrade), you can hand out fast, and throw void wretchs at your opponent and try and keep forcing them to pop back to their Deployment Zone, giving you the model number advantage on the Turf area. Now they are taking the "Into the Abyss" test with a -2 WP since you gave the enemy fast.
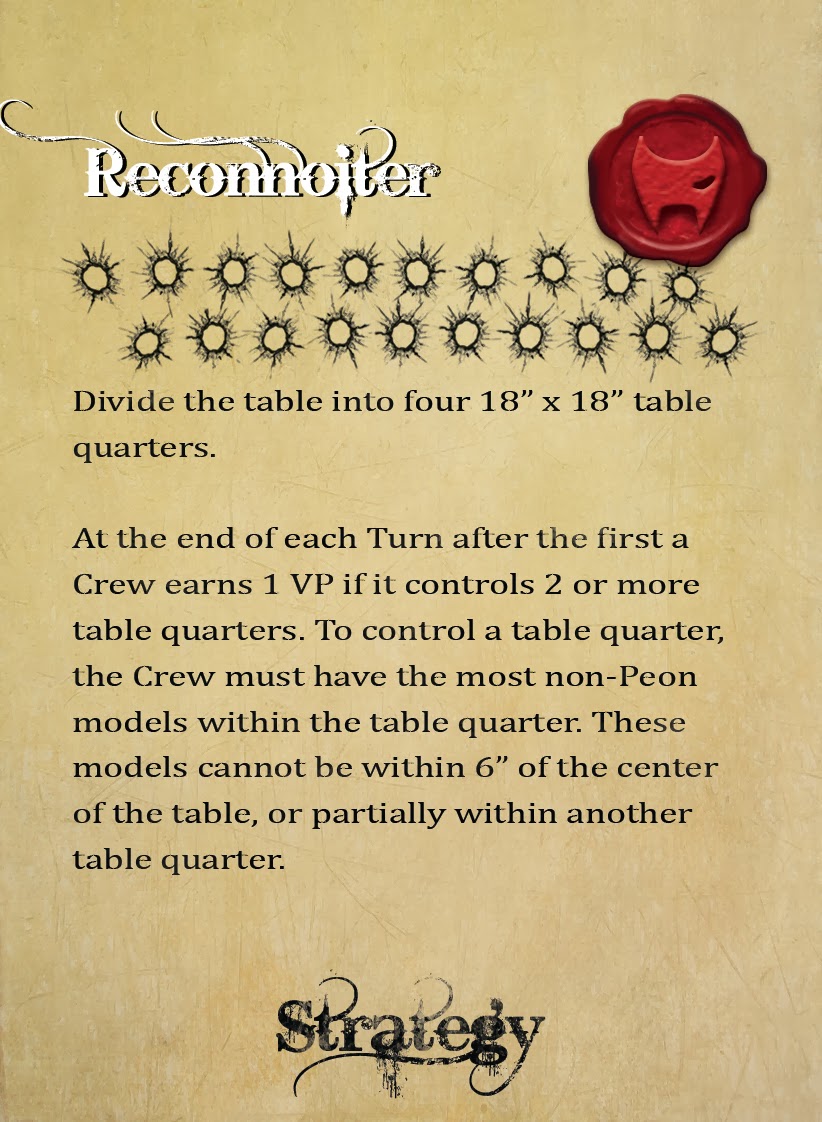
Reconnoiter:
I view Recon as a kill strategy. Its a calculated risk to move across that center line and engage your opponent. You want to put enough force into the attack and balance controlling the quarters on your side of the center line while taking out models across it. The beauty of Tara's crew is she can select the void wretchs and just have them defensive stance and hold your back field (this coupled with Protect Territory is amazing, but that's a discussion for schemes). This minimizes any hesitation she may have in crossing that centerline.
Regardless, 3 (or my dream 6 void wretchs) for recon is just fantastic. They split up, holding your back field. It can be quite powerful (sure at 6 void wretchs 24ss is a lot, but its an interesting build worth exploring for some). This allows for you to control activation as well as not have to worry too much about their "Pure Nothingness: At the start of every duel this model suffers -1 Df for each card in its controller's hand for the remainder of the duel." (which is a staple when choosing her obliteration models). This offers the luxury of crossing that centerline a little more and I always feel that if you can't control that center line on recon and your opponent is making the push its an inevitable loss.
Squatter's Rights:
With this one I like to get my models up across the center line as early as possible in order to put a log-jam in place to make it more difficult for my opponent to get in engagement range for turn 2 before I can flip over a squat marker. Obviously, you still want to have models in the flanks for this to get the ones towards the edge. My go to objective grabbers for Tara for this stuff are quickly becoming the necropunks (as a rezers), but overall I really can't discount the Void Wretch's simply because they are Incorporeal. With Wk5 and being sure her crew discard a bunch of cards during Tara's second turn (if she can win initiative) means you're getting them close to that Df8 and leveraging their Rg. 4 "(0) The Hectic Glow" either as they approach a Squat marker or after they flipped one over and need to 'hold' it they can really become quite resilient. This is a quick way to work towards the the goal of denying your opponent the ability to get squat markers on turn 2. A Df8, Incorporeal, ++ on all duels against Fast models is rare in Malifaux. Disclaimer of course, there is always the black joker, so make sure to gauge its probability of showing up. Since I mentioned necropunks I would be remiss if I didn't mention a great Outcast equivalent, the Ronin. They ability to deny a charge really slows down your opponent in trying to get to the squat markers.
Stake a Claim:
Tara really excels at this strategy as well since she can hand out fast to her models, and she gets two chances to drop / remove claim markers herself. There really isn't much more to say about that, it just works really well. AP is king in this one and Tara has a lot of it. Use some of the concepts mentioned in the previous strategies and you can see why I think this is the strategy she is the strongest at.
Summary:
I typically, play Tara as a solo master, which you wouldn't expect when you look at her stat line. Sure she has Through the Hole (very powerful) and Heartless, both which are defensive abilities against Shooters and Casters, respectively and she has an average Df/Wp of 5, but over all her stat line doesn't scream solo master at first glance (at least she didn't to me).
If you don't prefer to play solo, she can be used to 'buff' your crew by handing out fast, but I don't find that to be as effective as using her to control an entire side/flank of the board.
As Tara moves up the board she gets to choose when to bring other models to her side. Whether they are her opponents models are her own crew's models. So she can unbury a model near her, finish her activation, and than activate the newly unburied model. This means she can use her unburied models to tie up enemy models and continue moving across the board to capture objectives. Incredibly powerful and a technique I recommend trying if you haven't had luck with getting your VPs with her.
NOTE: The biggest counter to Tara based on what I've described above is any master/crew that has the ability to do decapitate, or gains strength from your Tara crew not having cards. You've been warned if you plan to take advantage of too many of her obliteration box set models. That is why I do often also try and minimize how many of her obliteration box models I take (except the recon concept :P).
Conclusions:
So while I think Tara excels at all strategies, here are is the order of strategies I think she is best at. Ordered best to 'worst', but she really does well in ALL of them. So what are your thoughts?
- Stake a Claim
- Squatter's Rights
- Reconnoiter (Turf War and Recon are both about the same)
- Turf War
- Reckoning
No comments:
Post a Comment